A USB mapping can be performed on the Q.station, which means that a connected device is manually assigned to a port. In GI Bench, for example, only up to 5 USB devices can be operated on one USB port, from USB0_0 to USB0_4. So, what happens if you want to use a PCAN-USB x6 with all CAN ports? In this case, the assignment of the USB ports must be manually changed, a process called mapping. The following simple steps must be followed for this:
1. Connect to the Q.station via SSH: All you need is for the Q.station and a computer to be on the same subnet. This allows you to connect directly to the Linux operating system of the Q.station using auxiliary programs like Putty. In Windows, you can easily access the Q.station via the command terminal. The following example uses Windows 10. Simply type the command "cmd" into the Windows search field and press ENTER.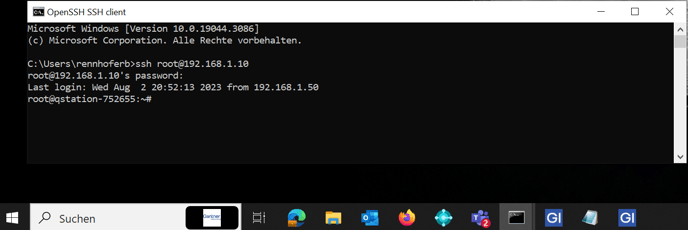
Next, enter the command "ssh root@[IP address of the Q.station]". Now, you will connect directly to the root admin of the Q.station. Afterward, you will be prompted for a password, which is typically the serial number of the Q.station.
NOTE: No characters will be displayed in the terminal while typing the password. After entering the password, press ENTER to confirm. You are now connected to the Q.station.
Use the command "cat /gins/fs/firmware/readme.txt" to open the readme.txt file on the Q.station, which offers a (more or less) good description of the mapping process. This file is also accessible via FTP using User: 1 and PWD: 1.
By entering the command
"dmesg", the content of the Kernel Ring Buffer is displayed under Linux. The messages contained within are typically generated by device drivers. dmesg stands for Display Message.
If the USB device (in this case, the PCAN USB x6) is detected, it will be visible here. Additionally, a useful piece of information is that the version number of the device is also displayed.
3. Identifying the address of the devices:To do this, you need to change the directory. Enter the following directory command at the prompt:
"ls -l /sys/class/pcan" and press ENTER.
You will now get the exact address of the individual PCAN CAN ports. The last part of the address must be copied. It is recommended to open a text editor window on your computer in parallel and copy each line into it. The following expression is what you need:1-1/1-1.4/1-1.4.1/1-1.4.1.1/1-1.4.1.1:1.0/pcan/pcanusbfd32
Now copy all the corresponding ports. In the file where you copied the routing information, you must complete each line with the destination where you want to route it:
1-1/1-1.4/1-1.4.1/1-1.4.1.1/1-1.4.1.1:1.0/pcan/pcanusbfd33 usb0_1
1-1/1-1.4/1-1.4.1/1-1.4.1.2/1-1.4.1.2:1.0/pcan/pcanusbfd34 usb0_2
1-1/1-1.4/1-1.4.1/1-1.4.1.2/1-1.4.1.2:1.0/pcan/pcanusbfd35 usb1_0
1-1/1-1.4/1-1.4.1/1-1.4.1.3/1-1.4.1.3:1.0/pcan/pcanusbfd36 usb1_1
1-1/1-1.4/1-1.4.1/1-1.4.1.3/1-1.4.1.3:1.0/pcan/pcanusbfd37 usb1_2
Note: The larger gap in the lines before the mapping (e.g., "usb0_0") is a tab stop.
In the example above, the pcanusbfd32 is routed to USB port 1.1, and pcanusbfd37 is routed to USB 2.3. Accordingly, these must also be used in GI.bench.

On the Q.station, the manual mapping now needs to be carried out. To do this, open the
devmap file using the Nano editor:"nano /gins/fs/firmware/devmap"
If nothing has been done on the Q.station yet, this file will be completely empty. Now, paste the lines you copied earlier into this file and save it using CTRL+O → ENTER. Then, exit the editor by pressing CTRL+X.

5. Check if everything worked:
First, the USB device must be unplugged and reconnected.
Afterward, the following command can be used:
cd /dev
ls -l usb*

FINAL
CAN 1-3 is now mapped to USB 1.1 to 1.3, and CAN 4-6 to USB 2.1 to 2.3.
→ Caution: When customers perform this themselves, mistakes can be made that may not be immediately visible.
→ It's best to always do this with support.
→ Use the command "exit" to log out of the Q.station.