Table of contents
Updating firmware using GI.bench
To update the controller firmware, ensure that the PC running GI.bench has internet access. If internet access is not available, you can download the latest controller firmware from Gantner Instruments' public SharePoint and then proceed to step 4 in the instructions below.
-
Start GI.bench and open Device Manager from the GI.service menu by selecting the GI icon in the Windows system tray and clicking Device Manager.

-
Right-click the connected controller, then select Firmware update → Check for new firmware online…

-
If a newer firmware version is available, a dialog will appear prompting you to download it. Click OK to proceed.

-
Next, right-click the controller again and select Firmware update → Update firmware of device…

Note: If the "Update firmware of device..." option is disabled, please check the network settings of both the controller and the PC to ensure they are within the same network range or that communication is not blocked by a firewall. -
In the next window, select the latest firmware version and click OK. If the firmware file was obtained through another source, click Open file… and select the appropriate firmware file.

-
Click Yes when prompted to confirm that the controller’s measurement mode may be interrupted. The firmware update will then start and may take several minutes. A confirmation message will be displayed once the update has been completed successfully.

Updating firmware using Firmware Manager
The Firmware Manager may be used to update the controller firmware in case GI.bench is not available.
- Download the latest Q.monixx controller firmware or Q.station controller firmware.
-
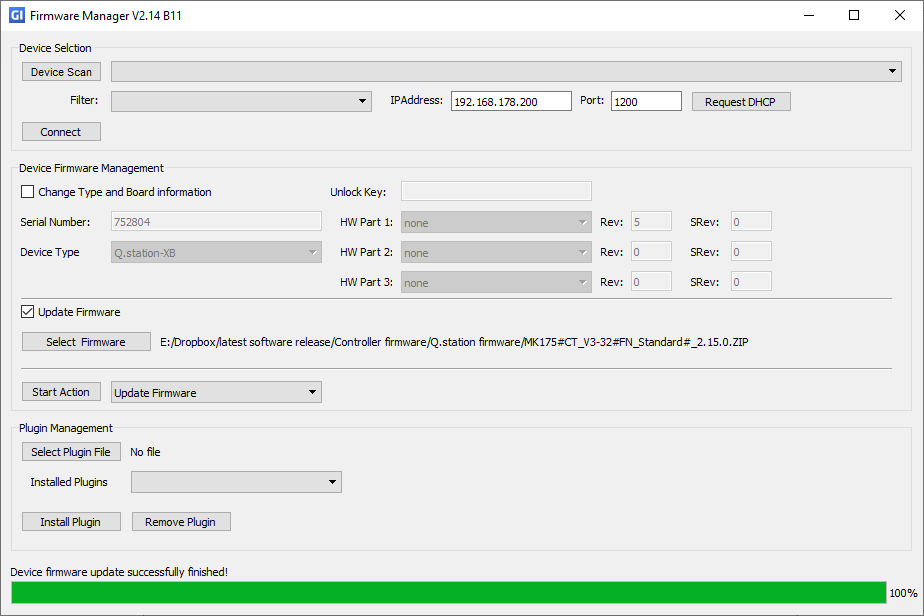
Start GInsFirmwareManager.exe and enter the IP address of the controller. The port number should be set to 1200 (default). Click Connect. A Successfully connected to Device: IP address message confirms a successful connection.
👉 If there is an active DHCP server in the network, click Request DHCP to ensure that the device will get the correct IP address.
-
Enable Update Firmware and click Select Firmware to select the firmware package that you want to install (for example MK175#CT_V3-32#FN_Standard#_2.15.xx.ZIP).
-
Select Update Firmware from the drop-down list and click Start Action. Wait until finished. A 'Device firmware update successfully finished!' message confirms a successful firmware update.
Special update procedure for v2.12 or earlier (Q.station only)
Due to the change from a package-based update (v2.12 and earlier) to an image-based update (v2.13 and later), the Q.station’s internal drive must be re-partitioned. This requires booting a USB drive with a service system to put the device into maintenance mode.
Follow these steps to enter maintenance mode on the Q.station controller:
Preparation
Set the controller to MAINTENANCE mode
-
Switch off the Q.station controller.
-
Plug the USB drive into one of the controller's USB ports (check that no SD card is installed).
-
Connect a USB keyboard to the other USB port.
-
Power on the Q.station and promptly initiate the process by alternately pressing F10 and F11 for a minimum of 10 seconds.
-
Press 2x the up arrow key (↑).
-
Press the Enter key to commence the installation of the Linux image. Allow approximately 5 minutes for the process to conclude. If the Q.station is equipped with a display, wait until it displays "qstation login."
Installing the firmware
-
Start GInsFirmwareManager.exe and click Device Scan and check if the controller is found in MAINTENANCE mode.
👉 Device Scan only works if GI.bench is running, if there is no version of GI.bench installed please enter the IP address of the controller manually.
👉 If there is an active DHCP server in the network, click Request DHCP to ensure that the device will get the correct IP address.
-
Click Connect. Successfully connected should be shown at the bottom. Change PC ethernet port IPv4 settings to match the Q.station if necessary e.g. IP 192.168.5.28, 255.255.255.0, 192.168.5.254
-
Enable Update Firmware and click Select Firmware to select the firmware that you want to install (for example MK175#CT_V3-32#FN_Standard#_2.15.xx.ZIP).
-
Select Initialize Device and click Start Action. Wait until finished. Remove the USB drive only when asked for and follow the instructions carefully.

-
Perform a power cycle of the Q.station to complete the installation.
In the event of a failed firmware update, check if the device retains the same IP address after being set to MAINTENANCE mode. If not, use the Device Manager in GI.bench or GI.monitor to reset the IP address to the original one, and then restart the firmware installation process.