For a description of converting from LocalBus to EtherCAT click here. For conversion from EtherCAT to LocalBus click here.
Latest Firmware Download
Download the latest XL or XE module firmware from our Public Download Area. If you do not know the specific firmware file to be downloaded, please download the ZIP file that includes all firmware files.Convert from LocalBus to EtherCAT
Changing the module from XL to XE firmware is done through the controller and requires test.commander or the Setup Assistant software. If you do not have test.commander installed, you can use the Setup Assistant, which is also included with GI.bench. The latest version of test.commander or Setup Assistant can be downloaded from the 'Downloads and Support Tools' section on our website.
- Ensure the XL modules are connected to the Q.station
- Install the latest version of test.commander software and make sure it is activated
- Run test.commander, do not need to create a new project or open an existing one.
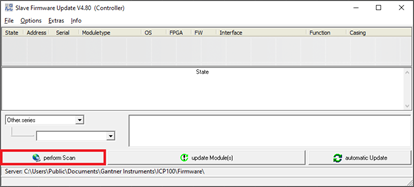
- Go to Utilities > Slave Firmware Update

- In the Slave Firmware Update window, select Perform Scan to detect the Q.station X controller
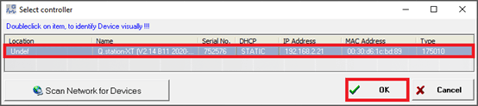
- Once the Q.station is detected, select it and Click OK
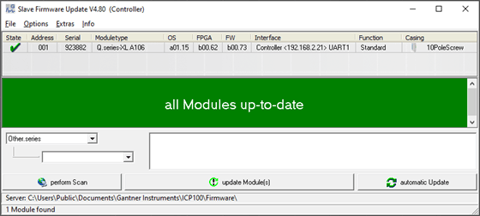
- The UARTs on the Q.station will be scanned for connected modules. Once that is complete, a list of the modules will be shown
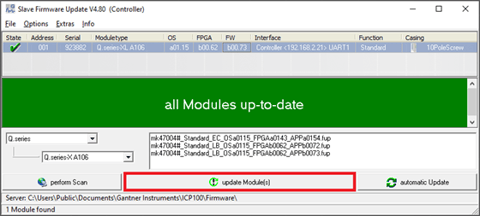
- To change a module between XL to XE or XE to XL, highlight the specific module and click update Module(s). It will show a list of the firmware available.
- To change from XL to XE, select the firmware file that contains EC in the filename and click OK. e.g. mk47004#_Standard_EC_OSa0115_FPGAa0143_APPa0154.fup
- The software will begin to update the module with the selected firmware. Make sure there is no interference to the power or comms of the system during the update process.
Convert from EtherCAT to LocalBus firmware
Changing the module from XE to XL firmware is done through the bus coupler and requires the ICP100 software. The latest version of ICP100 can be downloaded from the 'Downloads and Support Tools' section on our website.
-
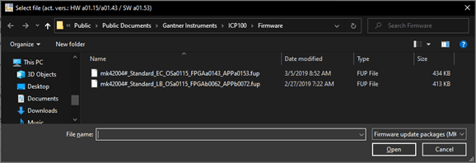
Copy the latest firmware files to the directory: C:\Users\Public\Documents\Gantner Instruments\ICP100\Firmware.
- Connect a USB cable (micro USB to USB-A) between the bus coupler and the PC, and then power on the system.
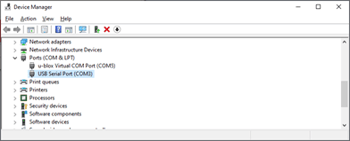
- Identify the COM port of the USB connection in the Device Manager (Windows).
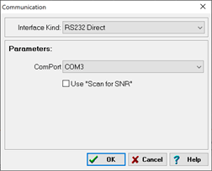
- Start ICP100 and go to Communication > Parameters... Set the interface to RS232 Direct and select the COM port of the USB connection. Click OK.
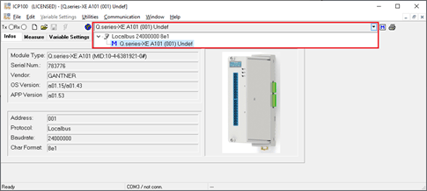
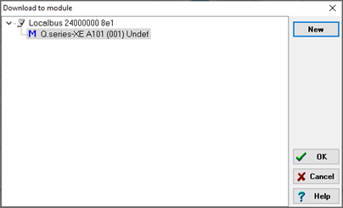
- Select File > Scan Bus. The first module will be displayed. To view the current configuration of a different module, click on the drop-down list.
- Go to Utilities > Download > Firmware Update. Click OK to proceed.
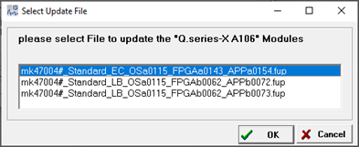
- Select the desired module to update and click OK.
- It will open a File Explorer window to the firmware directory. The files should already be filtered based on the module type. Select the file that contains 'LB' in the filename (e.g., mk39003#_Standard_LB_OSa0115_FPGAb0099_APPb0108.fup) and click Open.
- The software will initiate the module firmware update process. Please ensure there is no interference with the power or communication of the system during the update process.