-
Installing a controller plugin via GI.bench Cockpit (recommended)
-
Installing or updating a controller plugin via the Firmware Manager
-
Installing or updating a controller plugin via a USB flash drive
General plugin installation and update Instructions
The plugin version must match the controller firmware version. Therefore always install the plugin that comes with the latest firmware release.
- Download the plugin from the Plugins directory in the folder that matches the controller firmware version on Gantner Instruments’ public SharePoint.
-
Before installing the plugin for the first time, enable plugin support in the controller settings: Edit controller → Settings → Plugin mode.

Installing a controller plugin via GI.bench Cockpit (recommended)
-
Open an existing GI.bench project, or create a new project with the required controller configuration.
-
Open Cockpit from the menu bar and navigate to the Project State view.
-
Expand the Devices view and click Install plugin to load a plugin to the controller.

Installing or updating a controller plugin with Firmware Manager
The Firmware Manager can be used to update the controller firmware if GI.bench is not available.
Installing a controller plugin with Firmware Manager
-
Download GInsFirmwareManager.exe.
-
Start GInsFirmwareManager.exe and click Device Scan to locate the controller for which the plugin should be updated. Select the controller and click Connect. A “Successfully connected to device: IP address” message confirms that the connection was established.
- Click Select Plugin File and select the plugin to install (for example, GInsMQTTPlugin_##qstation-x32_2.18.2.0.zip).
-
Select Install Plugin and wait until the installation is complete.

Updating a controller plugin with Firmware Manager
-
Download GInsFirmwareManager.exe.
-
Start GInsFirmwareManager.exe and click Device Scan to locate the controller for which the plugin should be updated. Select the controller and click Connect. A “Successfully connected to device: IP address” message confirms that the connection was established.
-
Click Select Plugin File and select the plugin to install (for example, GInsMQTTPlugin_##qstation-x32_2.18.2.0.zip).
-
Select the current plugin version from the Installed Plugins drop-down list and click Remove Plugin. Wait until the process is complete.
-
Next, select Install Plugin and wait until the installation is complete.
Installing or updating a controller plugin via a USB flash drive
Installing a plugin using a USB flash drive
Plugins are included in the firmware plugin package, which forms part of the controller firmware update package. The plugin is installed from a USB flash drive. Locate the required zipped plugin file in the latest controller firmware folder, then follow the installation procedure below:
- Extract the ZIP file to a clean FAT32-formatted USB flash drive. The drive must contain the two uncompressed files: autorun.sh and GInsPluginName.ZIP.
- Insert the USB flash drive into the controller and wait 30 seconds.
- Power cycle the controller.
Updating a plugin using a USB flash drive
-
Start GI.monitor from the GI.bench menu in the system tray.

-
To connect to the controller, enter the Server Address, set the Server Port to 1200, and click Connect. If the controller’s IP address is unknown, use Search to locate all controllers connected to the network.

-
Go to PluginAPI > RemovePlugin in the Available Methods menu. Enter the name of the plugin (typically ‘GInsNamePlugin’) and click Send.
-
Unpack the Zip file to a clean FAT32 format USB flash drive (2 uncompressed files: autorun.sh + GInsPluginName.ZIP).
-
Plug the USB flash drive into the controller and wait 30 seconds.
-
Power cycle the controller.
Verifying the plugin installation
To verify that the installation was successful, go to PluginAPI → GetInstalledPlugins in the Available Methods menu and click Send. The response will list the plugins currently installed on the controller.
Alternatively, check the #actual.sta file on the controller (via FTP, username 6, password 6). If the plugin was installed successfully, a corresponding entry will appear in the PLUGIN STATES section.
PLUGIN STATES:
   Plugin 0: GInsPluginName	Act: 1	Cycles: 1709980	Version: 0.1	Port: 1201
Installing or updating a plugin on a Q.core data server
Installing a Q.core plugin
In order to install a plugin on the Q.core, an admin password is necessary. Please reach out to technical support to obtain this password.
-
Access the Q.core's hard disk by typing its IP address in Windows File Explorer (for example: \\192.168.5.166\). When prompted for login details enter username data and password ginsdata.
-
Navigate to \Data\hd0\ (for example \\192.168.5.166\Data\hd0\) and create a new folder. Change the name to the name of the plugin, for example, 'GInsScanivalve'.
-
Unpack the plugin Zip file to the newly created folder (3 uncompressed files: autorun.sh + content.dat + GInsNamePlugin.zip).
-
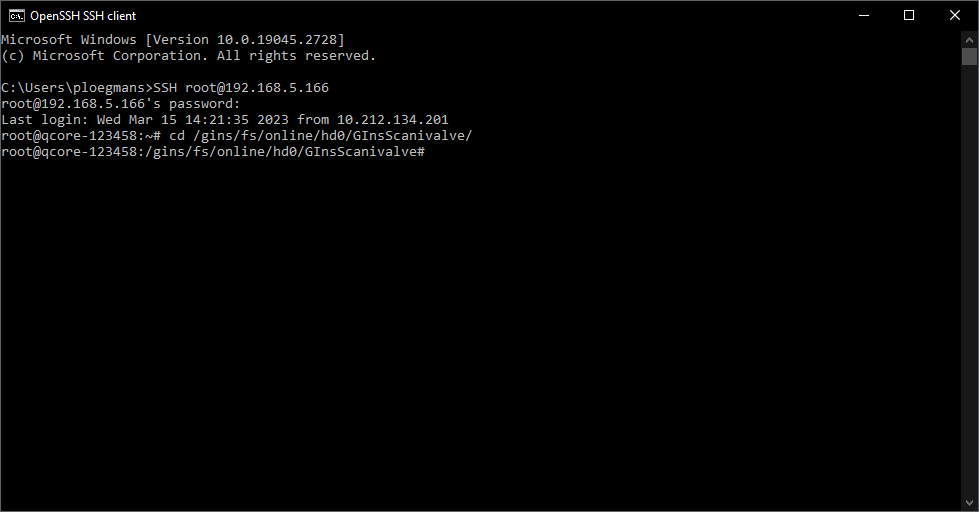
Open the Windows Command Prompt and connect to the Q.core by typing the command SSH root@ipaddress (for example SSH root@192.168.5.166). When asked if you want to continue connecting type yes. Enter the root password and press Enter.
-
When logged in, type cd /gins/fs/online/hd0/GInsPluginname/ (for example 'cd /gins/fs/online/hd0/[GInsScanivalve/') and press Enter.
-
Type ./autorun.sh and press Enter. When asked to replace an existing plugin, select A and press Enter.
If the console answers with a permission denied, please run: chmod 777 autorun.sh -
A confirmation message Plugin successfully registered! to indicate that the plugin is installed successfully.

Updating a Q.core plugin
When updating a plugin the old version needs to be uninstalled first.
-
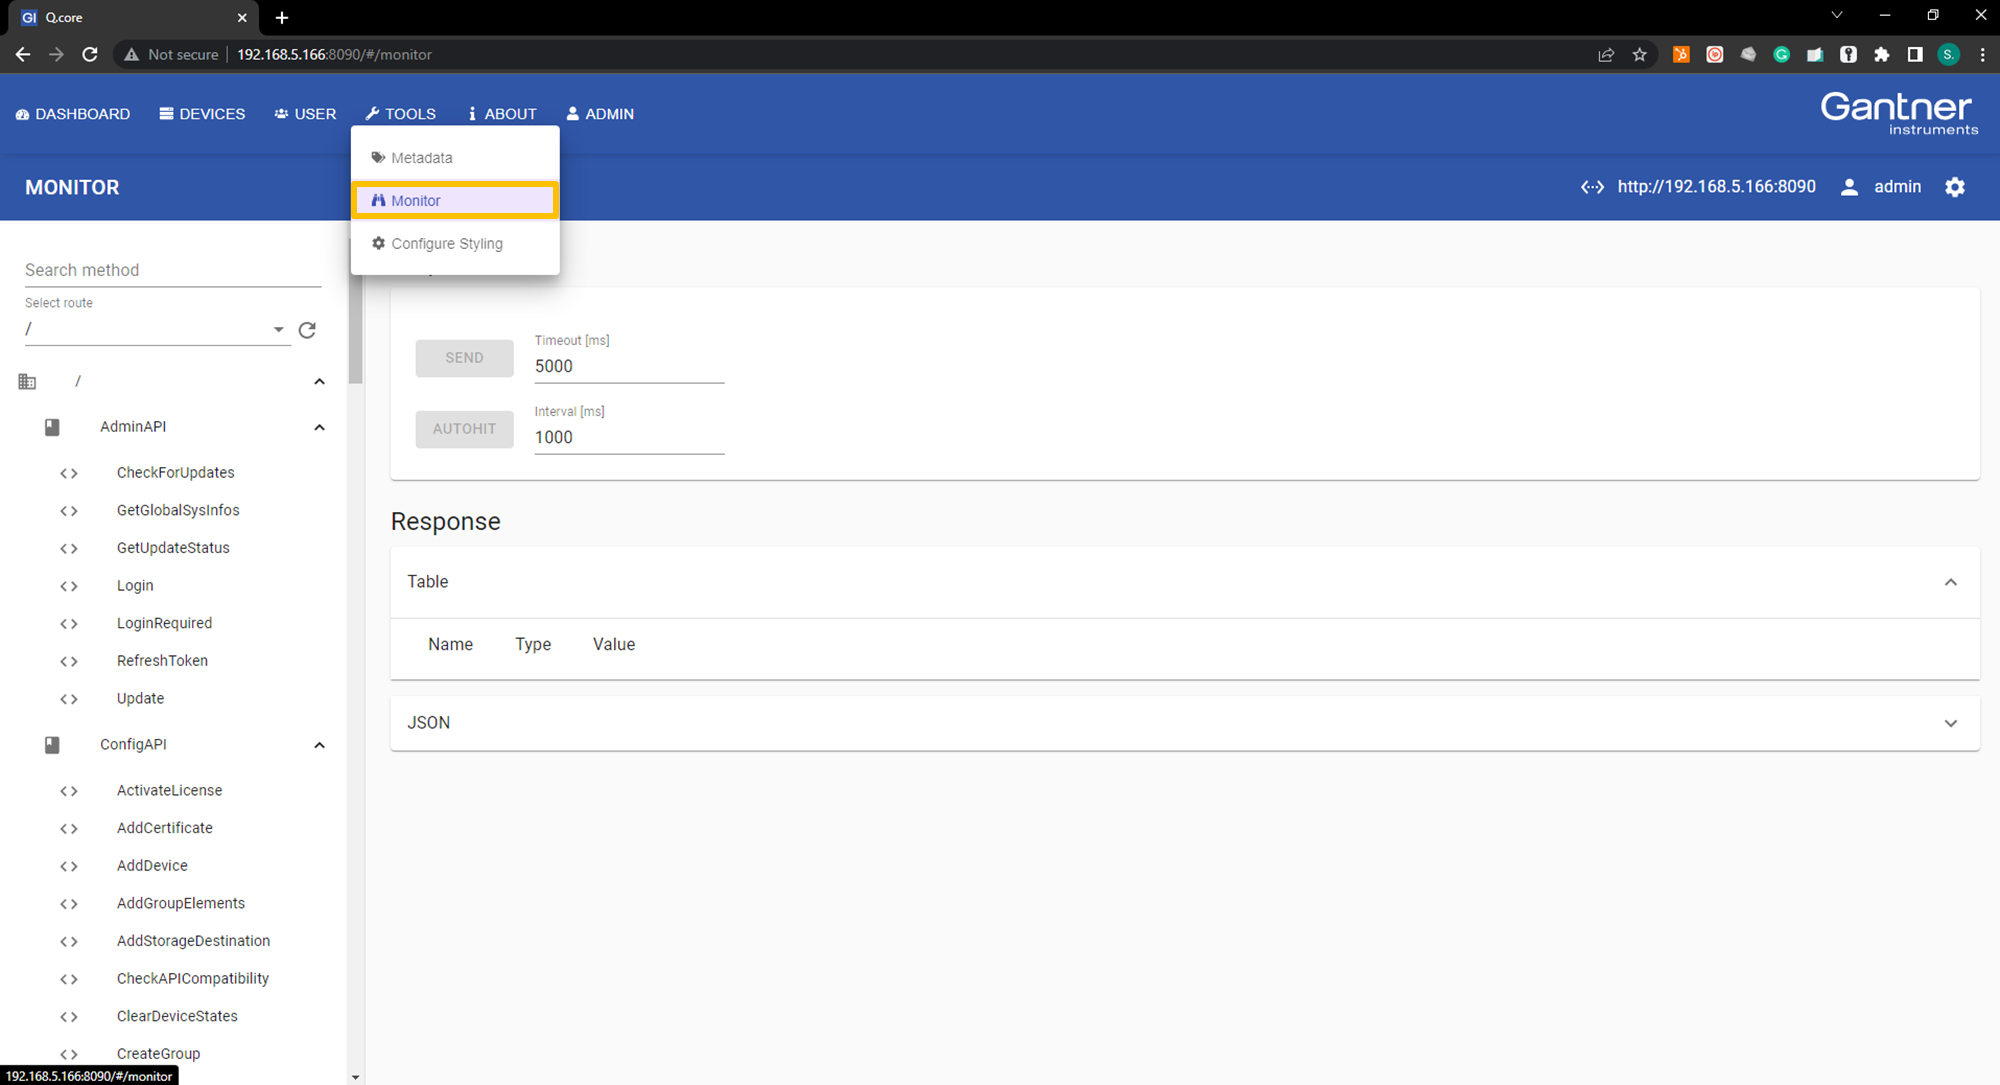
Open the Q.core management interface by typing the IP address and port number in your web browser (for example http://192.168.5.166:8090/).
-
Go to Tools > Monitor.
-
Go to PluginAPI > RemovePlugin in the Available Methods menu. Enter the name of the plugin (typically ‘GInsNamePlugin’) and click Send.

👉 If you do not know the name of the plugin, go to PluginAPI > GetInstalledPlugins and click Send. This will show the name of the installed plugin(s).
- To install the new plugin follow the steps described in the section "Installing a plugin".